Deploying .NET Applications to Azure Kubernetes Service (AKS) using Github Actions

Ensono
In this post, we will look at the steps needed to deploy your .NET application to an Azure Kubernetes Service (AKS) instance in Microsoft Azure using GitHub actions. First, this post assumes you already have the basic infrastructure deployed to support AKS. You should have a Windows agent pool in your service and an instance of Azure Container Registry already deployed.
In order to test locally, you will also need Docker Desktop installed on your machine. This should be done before you create your Visual Studio project below.
To start, we need some application code. Using Visual Studio, I will create a new project. For this walkthrough, I will be using an ASP.NET Core Web Application. I will also be publishing my source code in GitHub. This repository is already cloned locally to my machine.
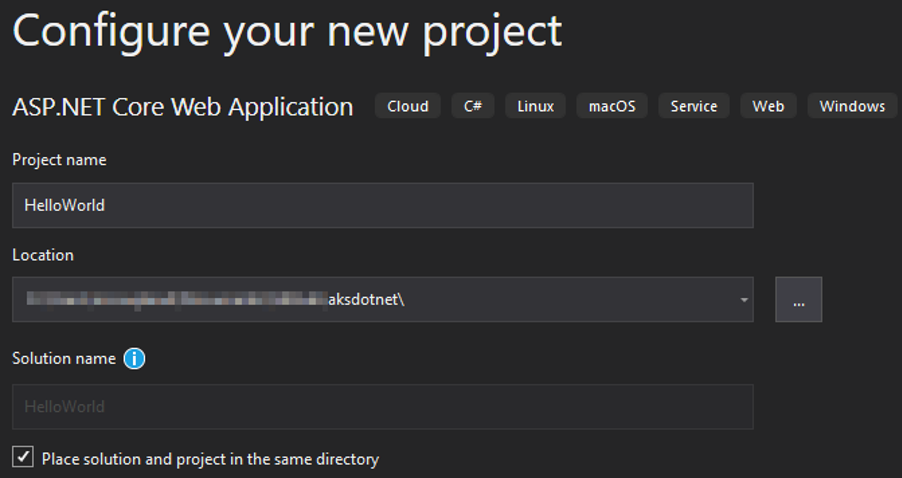
This is a sample application. You can see from the screenshot above that I have called the project HelloWorld and made the choice to place both my project and solution in the same directory. On your project options window, I have still chosen to use the Web Application (Model-View-Controller) template. I have also enabled support for Docker using the Enable Docker Support checkbox. Finally, in order to keep the footprint of the application small, I am using .NET Core with ASP.NET Core 3.1.
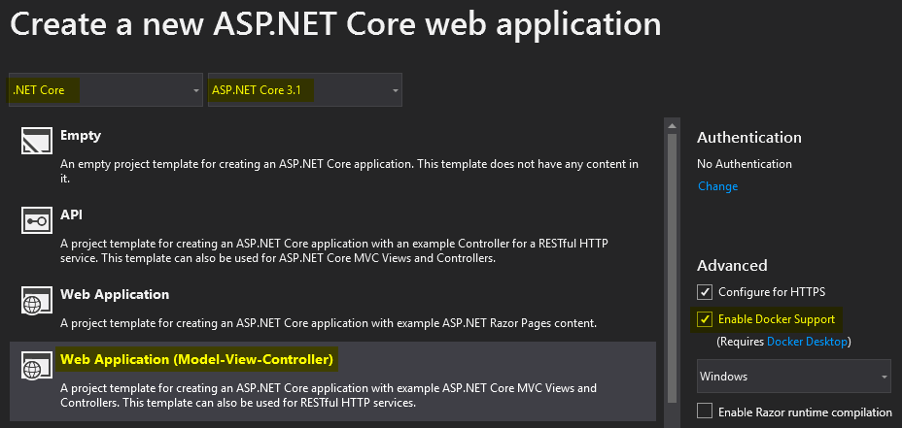
In this example, we won’t be doing any development. This is just a sample application we want to run. Next, publish your Visual Studio project to the file system.
Now, to make sure that AKS is ready to accept our configuration and deployment of our container, issue the following command to get the credentials of your AKS cluster.

Next, we can issue a command to kubectl to make sure we have a pool available with Windows as the operating system. As you can see from the screenshot below, we do have the correct configuration to proceed (note the OS column).

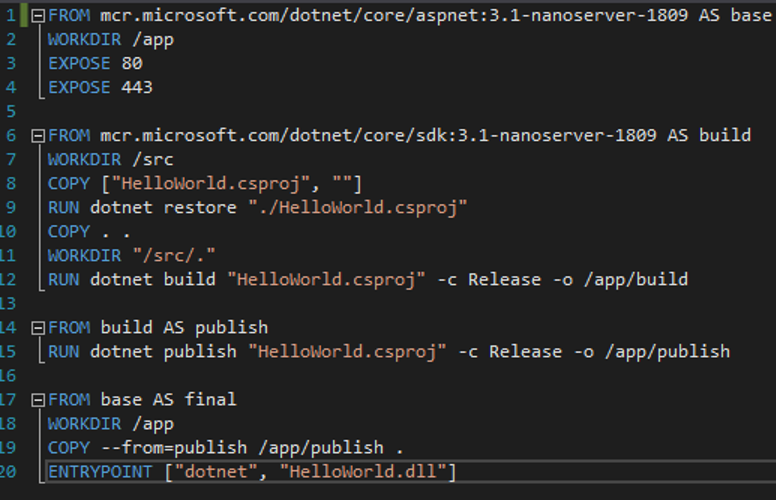
By enabling Docker support when you created your project, you will notice that in the root of your solution in Visual Studio, you can see a file called Dockerfile. This is an instructional file that tells Docker how to create and build your container.
This file contains the image that will be used from the main container registry to build your container. It also includes commands on what files to use to build your application and define the entry point for your container.
Testing the container locally
You can now test the deployment of your image locally if you have Docker Desktop installed. Start building your application using the command shown below. You need to run this from the folder where you placed your Dockerfile (due to the path length, I am using the “prompt $g” command to shorten the prompt for display purposes).
If this is the first time you have compiled your container, it may take a few minutes for you to cache files locally. The build process may also take a few minutes depending on the size of your application. The output from the following command will be quite long as well.
docker build -t aksdotnet.
When this step completes, you will now need to run the container. Use the command below to start the container.

Provided all is well when you navigate to http://localhost:8080, you should be greeted with the default ASP.NET Core welcome page

Pushing from source control
Once you are ready to deploy to the actual container service, you can test locally. You can do this two different ways.
The first way is by using a series of commands that tags the container and deploys it to your Azure Container Registry instance. You can then create a YAML file with the container configuration in it and apply the file using the kubectl command.
The other way, (and in my opinion much more elegant) enables continuous delivery of your containers using GitHub actions. In the portal, head to your AKS service and click Deployment center (preview) from the navigation pane. Next, select GitHub, authorize permissions to your GitHub account and then select the repository and branch you want to deploy from.
In the next step, the wizard should automatically pick up your Dockerfile path, port number, and build context from the contents of the Dockerfile. You should see something similar to that shown below.
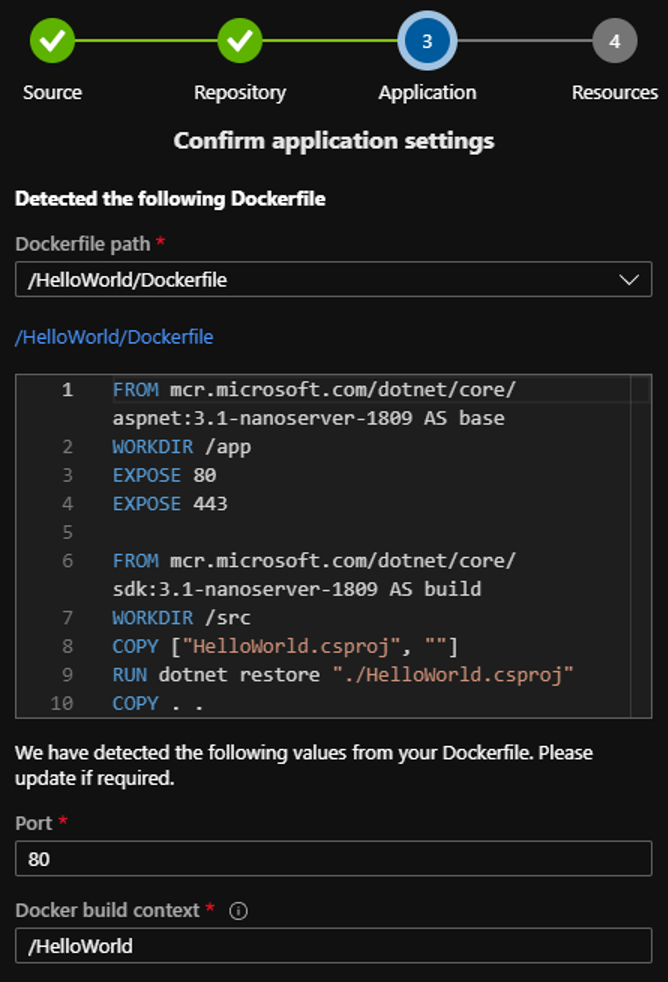
You will then be asked to select a container registry, if you have one. Then select your existing ACR. Note: for this you will need the admin access enabled in the ACR you create or select. When you click Done, the wizard will go ahead and set up the required steps to enable continuous delivery.
Head over to your GitHub repository and click the Actions button on the menu. You should see your initial build and deployment starting. You can then click the option in the portal to dig into the log file further. Using the default configuration, you’ll soon realize that the deployment fails.

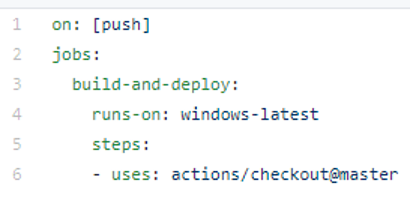
This happens because the defaults in GitHub Actions run the build on Ubuntu. However, this is a Windows image and we need to modify the deploytoAksCluster.yml file. Change line 4 in the screenshot below to say “windows-latest” instead of “ubuntu-latest”.
When this step is finished, you can issue the following command in kubectl to make sure that the pod is running and head over to your public IP address, or private if you don’t have one, and check that the page is running properly.

If everything is working as expected, you should see the following page when you navigate to the IP address.

There you have it! Once you have your application source, deploying to AKS is pretty simple. Doing it through a continuous delivery pipeline has many benefits as well. Once it’s set up, you can commit code and it will run through the deployment again and again.
Social Share
Don't miss the latest from Ensono
Keep up with Ensono
Innovation never stops, and we support you at every stage. From infrastructure-as-a-service advances to upcoming webinars, explore our news here.
Blog Post | December 17, 2025 | Industry trends
How to Secure Executive Buy-in For Mainframe-as-a-Service (MFaaS)
Blog Post | December 4, 2025 | Industry trends
Managing Technical Debt Starts with Smarter AI Governance
Blog Post | November 19, 2025 | Research Reports